

Tutorial by Sikha Poyyil, Partner Solution Engineer, Automation Anywhere. Note: We do understand that a lot of us do not have access to SAP systems, but that doesn't limit us from trying out this tutorial. To keep this tutorial simple, we have simulated the SAP API response using a test endpoint that sends the response back in XML format just like how a real SAP API would do. In this tutorial, we will understand how to build an Automation 360 bot to parse the XML response received from the SAP RFC API.
For background, while working with SAP systems, the ability to call remote functions is provided by the Remote Function Call (RFC) interface and we can communicate from external systems (like the RPA bot in this case) using the RFC API. Let’s divide the steps into 4 sections and here are the specifics to build this bot.
Section 1: Execute a REST API call and establish a session to use the XML operations using the XML package.
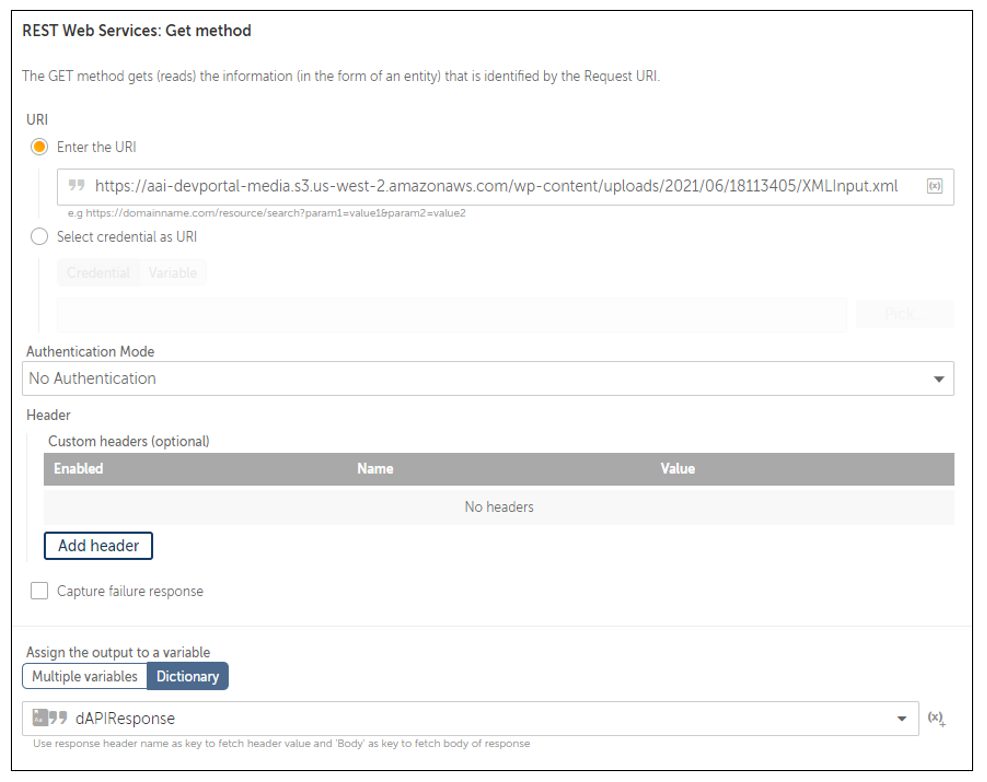
To execute a REST API call, use the action REST Web Services → GET Method, enter the URI 'https://aai-devportal-media.s3.us-west-2.amazonaws.com/wp-content/uploads/2021/06/18113405/XMLInput.xml' without the quotes in the 'Enter the URI' field, and leave the Authentication mode as 'No Authentication' since we haven't built out any authentication for this test API. We will assign the output to a dictionary variable dAPIResponse.
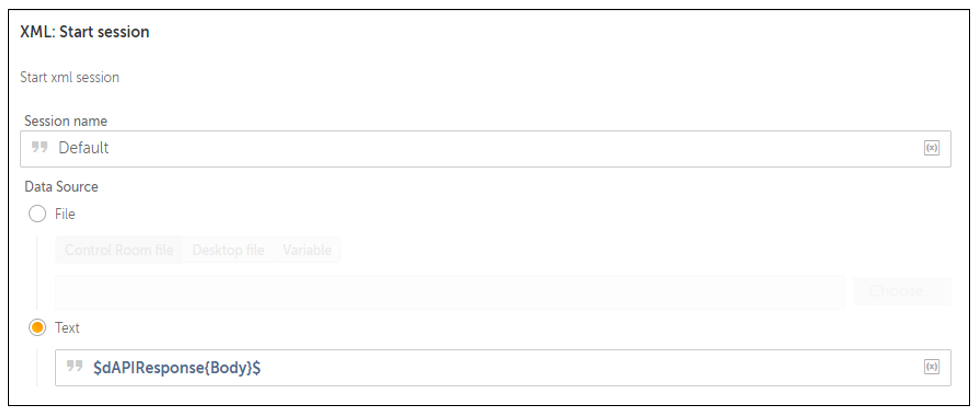
As a next step, let's establish an XML session for performing XML operations. Using the action XML → Start Session, enter the Session Name (we will leave it as Default, feel free to use a name as per your wish), select the Data source as Text option, and get the XML from the body of the dictionary variable by adding $dAPIResponse{Body}$ in the Text field.
Here is how the code looks like from this section 1.

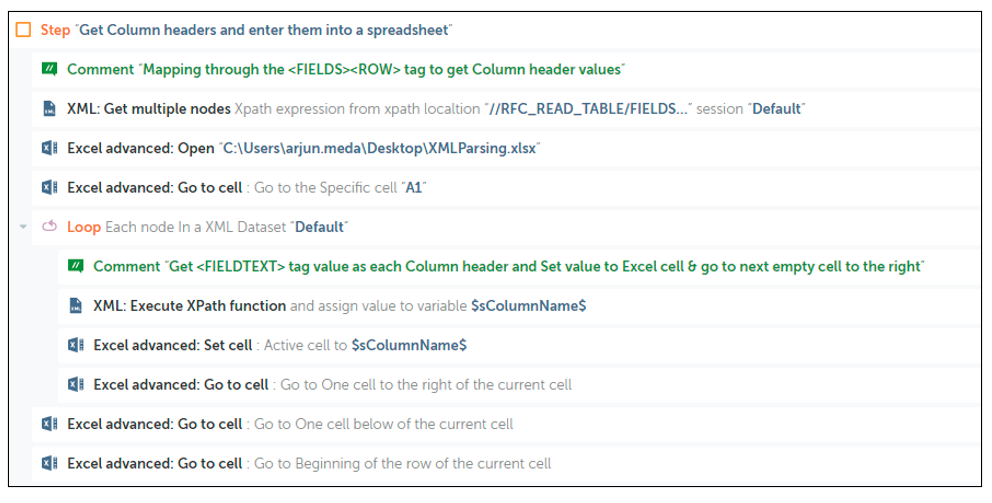
Section 2: Parse the XML to read the column headers and enter them into a spreadsheet.
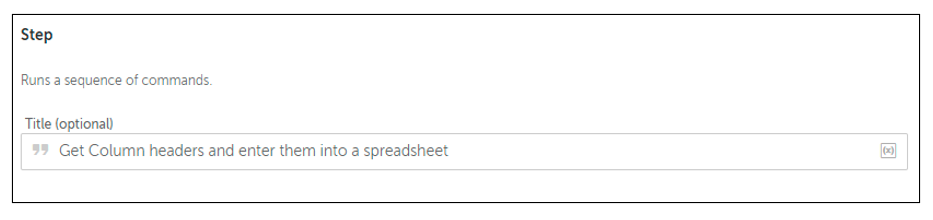
To maintain logical separation, we will use the Step Action and then place all the actions within this Step action. The step is being used here as a best practice to organize our logic in a meaningful way. While not a complete necessity for the functionality of our bot, it’s good to be in the habit of logically breaking up your code into steps for readability/maintenance. Use the Action Step → Step, and Enter the Title as ‘Get Column headers and enter them into a Spreadsheet'.
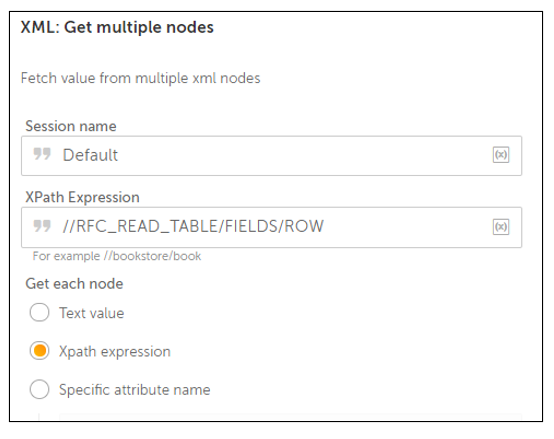
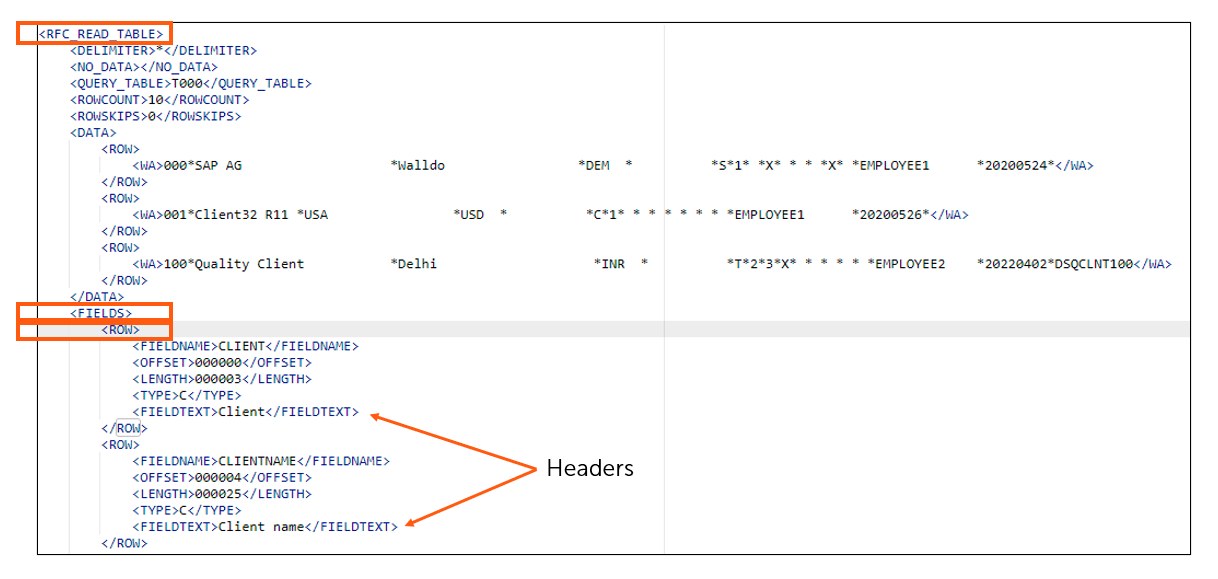
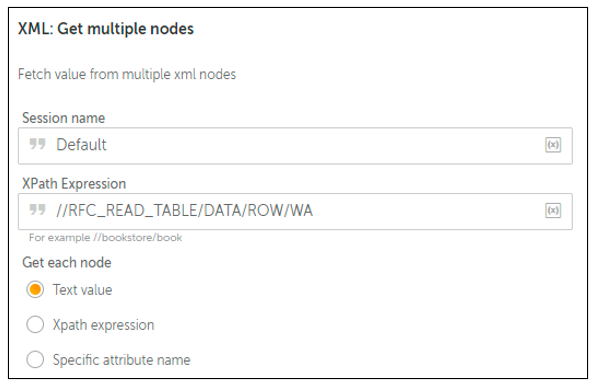
Now let’s read the column headers. This data is available in the tag <FIELDS><ROW>. Use the Action XML → Get multiple nodes. We will leave the Session Name as Default and add the XPath Expression as //RFC_READ_TABLE/FIELDS/ROW and Select the value for ‘Get Each Node’ as Xpath expression.
This will fetch us all the nodes within the XPath Expression.
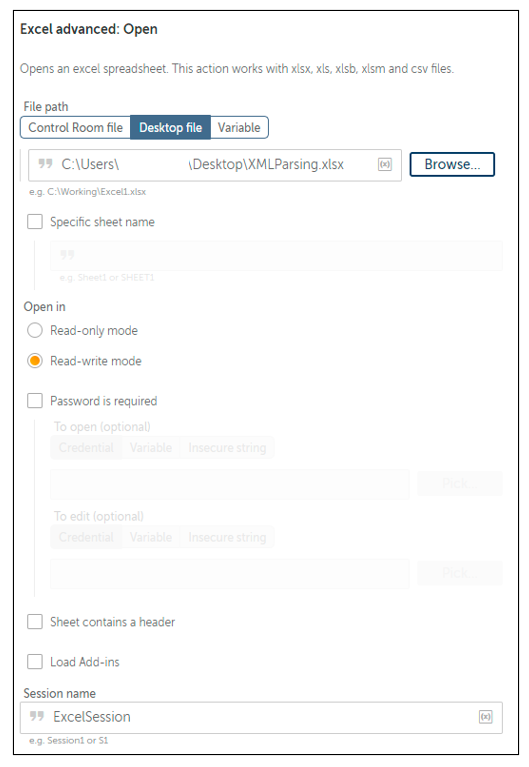
We have to loop through each of the nodes and identify just the Column header as shown in the image above. Before we add a loop, let’s create a spreadsheet and open it, so that the values can be extracted and updated in the spreadsheet. Use Excel Advanced → Open, Select the Desktop File path and Enter a session name, we will leave the other parameters as is.
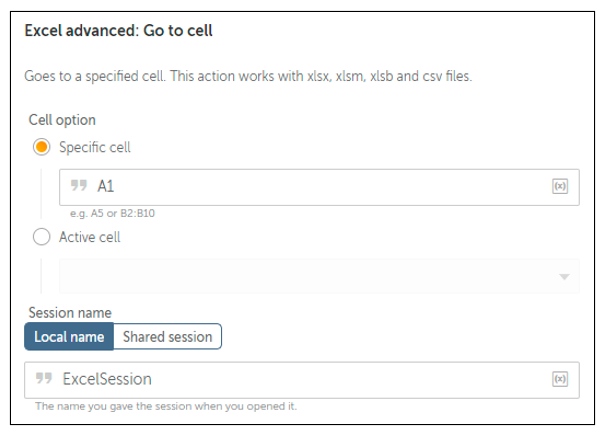
Next, we want to ensure the cursor is at the first cell. For this, we will use the Action Excel Advanced → Go to Cell, Select the Specific cell option and Enter the cell value as A1. Add the session name used earlier.
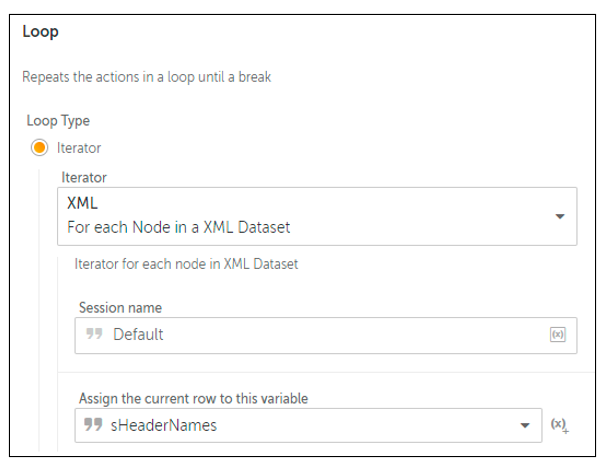
Now let's loop through each of these nodes using Loop Action and get the Column Names. In the Iterator dropdown, select ‘For each node in an XML Dataset’ and enter the session name as Default which we have used in the initial step for XML → Start Session. Assign the output to a string variable sHeaderNames.
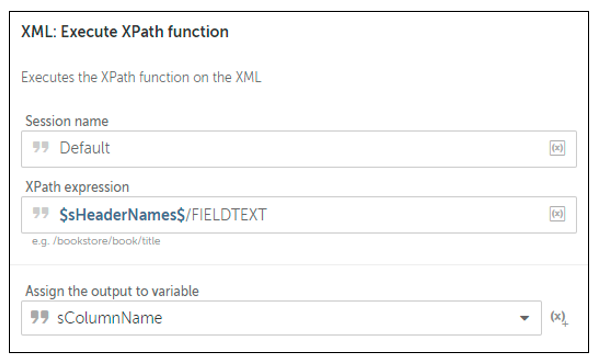
With this step, variable sHeaderNames will contain data from tag ROW within the tag FIELDS. We can see that the column name is available with the tag FIELDTEXT, and we can get this data using the action XML → Execute XPATH function. Configure the parameters: Session Name as Default, XPath Expression as $sHeaderNames$/FIELDTEXT, and assign the output to a string variable sColumnName.
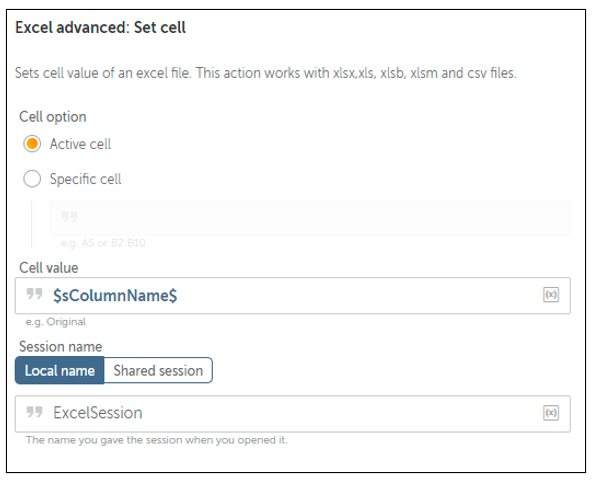
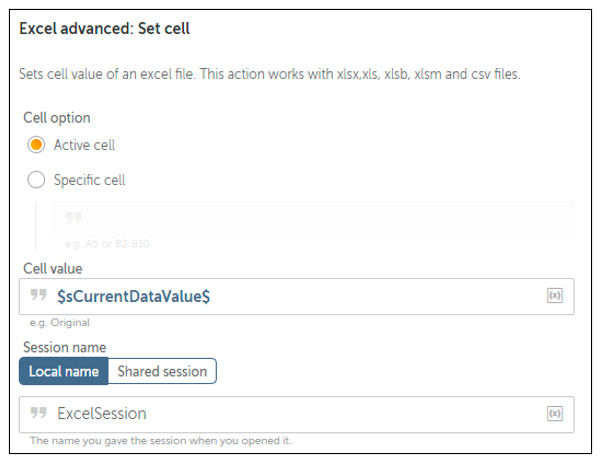
We have the required column names to be entered into the spreadsheet. Now, we will update the spreadsheet using the action Excel Advanced → Set Cell, Select the Cell Option as Active Cell, enter the Cell Value from the variable sColumnName and enter the Session Name. And we have already ensured that the cursor is available at the first cell A1. So the cell A1 will be updated.
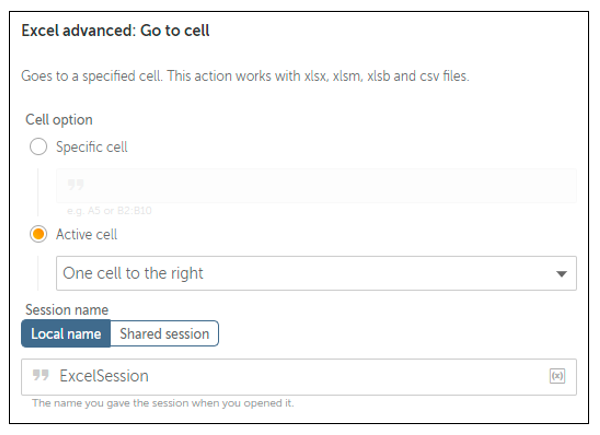
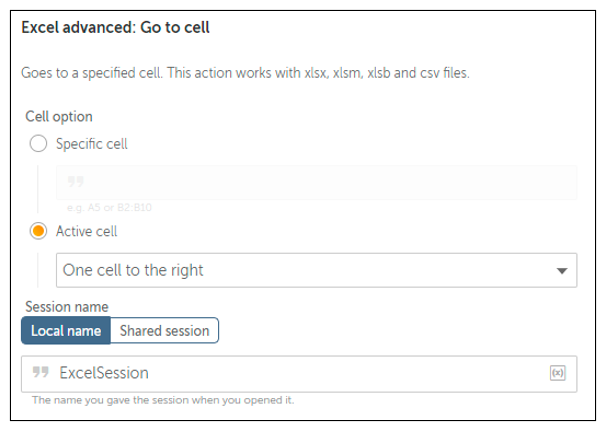
In the next iteration, we need the cursor to be moved to B1, which is one cell to the right of the current Active Cell. To do this, we will use the action Excel Advanced → Go to Cell, Select the Cell option as Active cell, and select the value 'One cell to the right' in the dropdown and enter the session name.
Now we have all the column names entered into the spreadsheet.

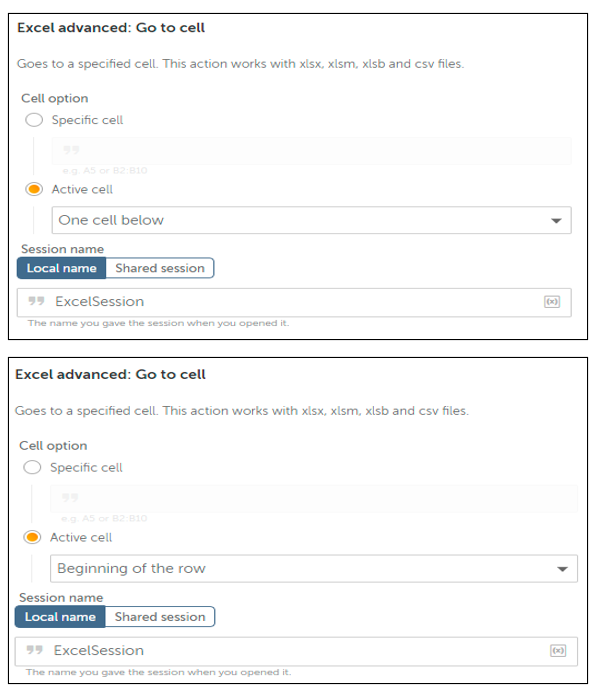
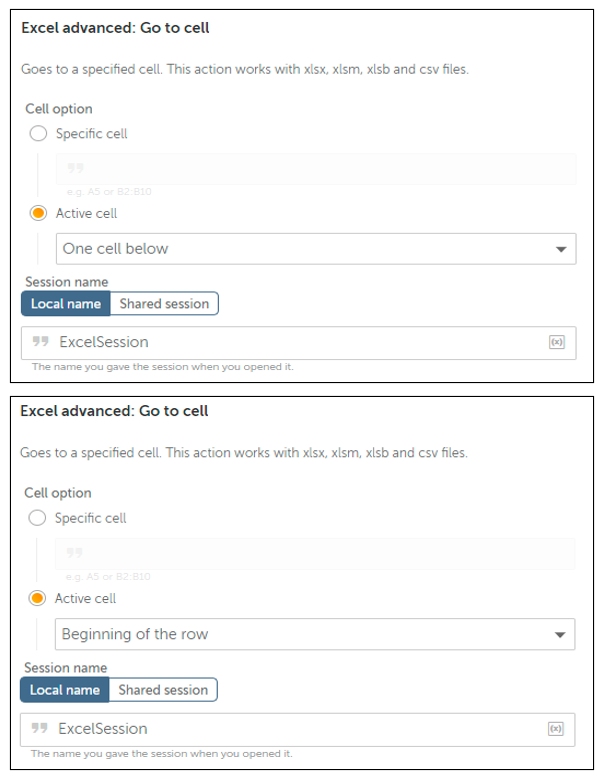
Before we proceed to get the values for all these columns, we need to ensure that we move the cursor to the beginning of the next row. For this, we will use the following 2 actions (outside the loop used above). The first action is to use Excel Advanced → Go to Cell, Select the Cell option as Active cell, and select the value 'One cell below' in the dropdown, and add the Session name. The second Action is to use Excel Advanced → Go to Cell, Select the Cell option as Active cell, and select the value 'Beginning of the row' in the dropdown, and add the session name.
And the image below shows the full logic within the entire Step Action.
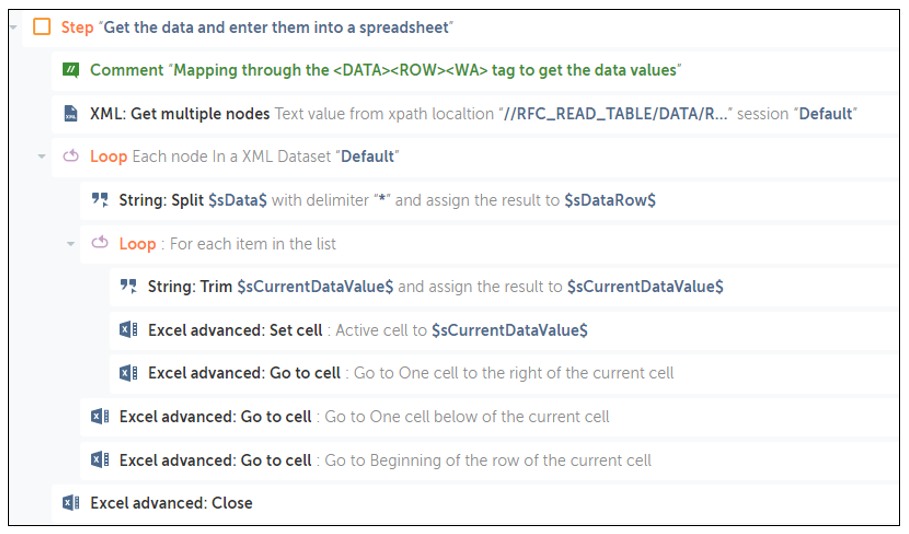
Section 3: Parse the XML to read through all the rows of data and enter them into a spreadsheet
We will use the Step Action and then place all the actions within this Step Action. Use the action Step → Step, and Enter the Title as ‘Get the data and enter them into a spreadsheet'
Next, we have to read the data from multiple rows for all the columns which are available within the tags <DATA><ROW><WA>.
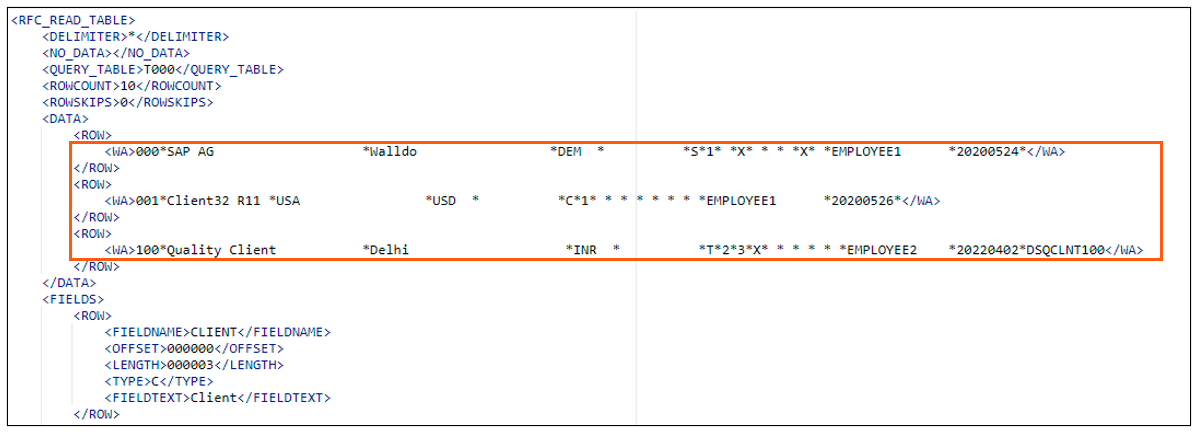
We will use the Action XML → Get multiple nodes and configure the properties. We will leave the Session Name as Default and add the XPath Expression as //RFC_READ_TABLE/DATA/ROW/WA and Select the value for ‘Get Each Node’ as Text Value. This will fetch us all the data within the selected XPath Expression.
We have to loop through each of the rows and get the data for each column. Add the Action Loop. Select the Iteration 'XML - For each Node in a XML Dataset', enter the Session name as Default, and assign the current row to a string variable sData. During each iteration, variable sData will contain data like this (example shown below is from the first row): Notice that the values contain spaces at the end, which we will remove later.) 000*SAP AG *Walldo DEM * S1 X * * X *EMPLOYEE1 20200524 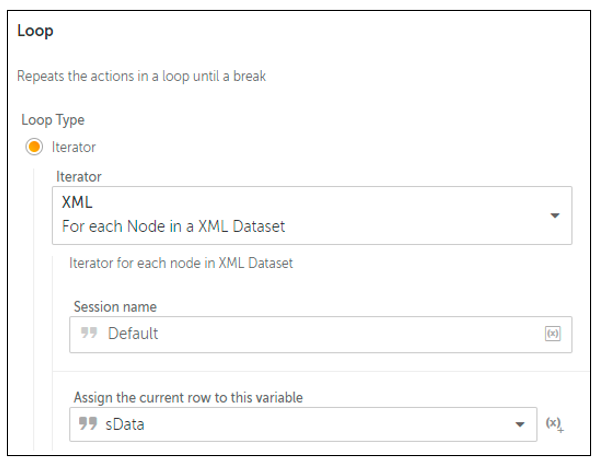
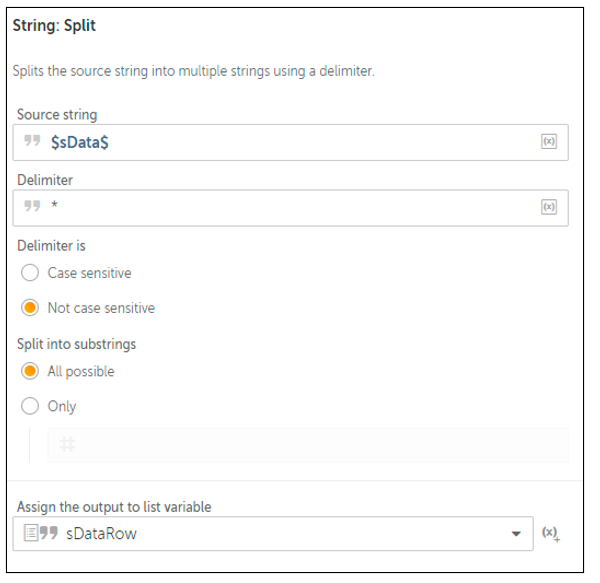
As we can see, the values are separated by a delimiter asterisk ('*'). Let’s split the entire string based on the delimiter. Use the action String → Split. Enter the source string as $sData$, Delimiter as Asterisk ('*'), Select Delimiter is ‘Not Case Sensitive’, Split into substrings as ‘All possible’ and assign the output to a list variable sDataRow, since it will contain multiple values.
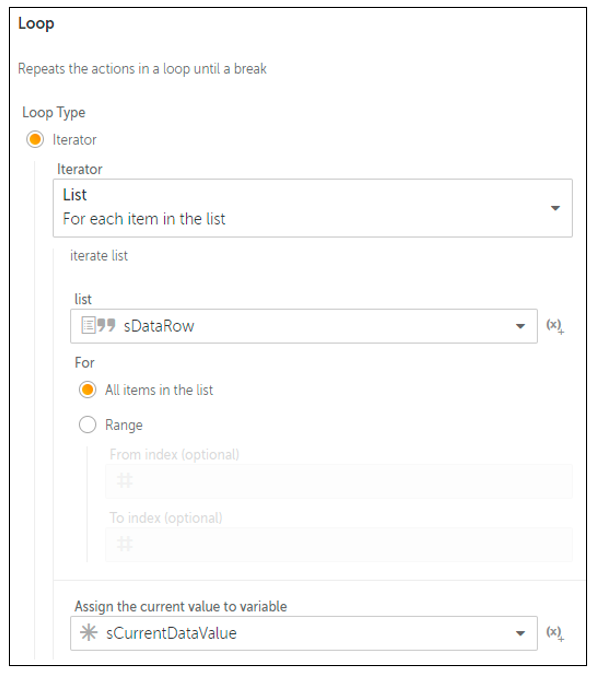
The next step is to loop through the List and get each value and update it in the spreadsheet. Use the Loop Action (this will be a nested loop which is inside the loop added above to loop through each node in an XML dataset). Select the Iterator as List - For each item in the list, select the list variable as sDataRow. Select For ‘All Items in the list’ and Assign the current value to a string variable sCurrentDataValue.
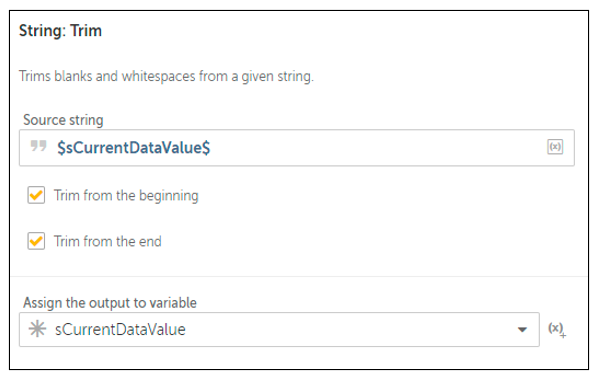
As we have seen the data above, that it contains whitespaces at the end of a couple of values, let's add a step to remove them. Use String → Trim. Select Source string as variable sCurrentDataValue, Select the checkboxes for both ‘Trim from the beginning’ and ‘Trim from the end’ and Assign the output to the same variable sCurrentDataValue.
Now we can enter these trimmed values into the spreadsheet. Use the action Excel Advanced → Set Cell, Select the Cell Option as Active Cell, enter the Cell Value from the variable $sCurrentDataValue$ and add the Session Name. And we have already ensured that the cursor is available at cell A2. So the cell A2 will be updated.
In the next iteration, we need the cursor to be moved to B2, which is one cell to the right of the current Active Cell. To do this, we will use the action Excel Advanced → Go to Cell, Select the Cell option as Active cell, and select the value 'One cell to the right' in the dropdown and add the session name.
Now we have all the data entered for that specific row. For the next iteration, we have to move the cursor to the beginning of the next row. For this, we will use the following 2 actions (outside the inner loop). The first action is to use Excel Advanced → Go to Cell, Select the Cell option as Active cell, and select the value 'One cell below' in the dropdown and add the Session name. The second Action is to use Excel Advanced → Go to Cell, Select the Cell option as Active cell, and select the value 'Beginning of the row' in the dropdown. Add the session name.
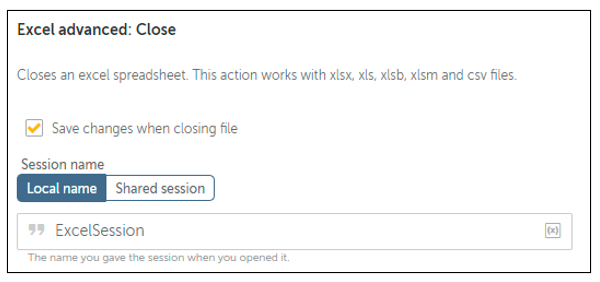
All the updates are completed within the loops and it's time to close the spreadsheet. Use the Action Excel Advanced → Close, Select the checkbox ‘Save changes when closing file’ and add the Session name.
Here is how the code looks like from this entire section 3.
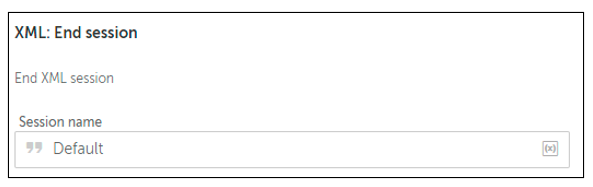
Section 4: Close the XML session opened initially.
Use the action XML → End session and leave the session name as Default.
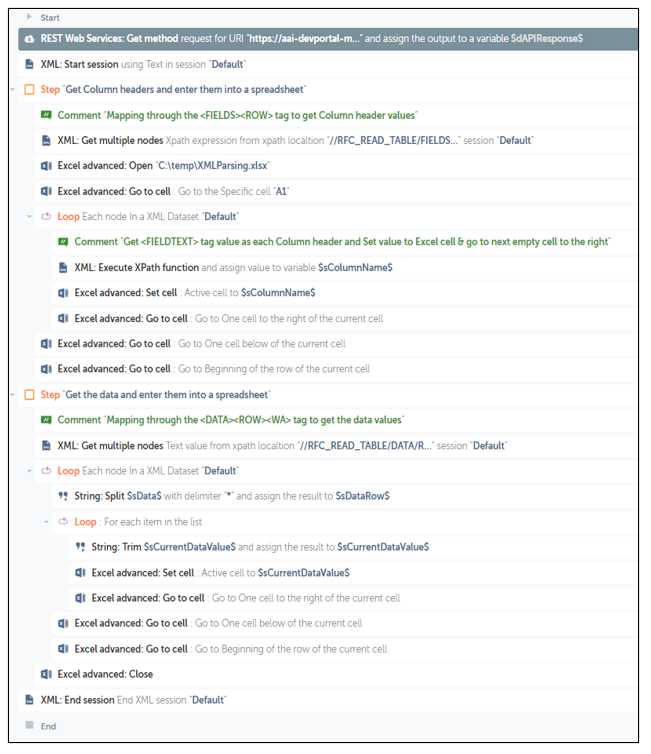
The image below shows the full bot. Save the Bot, Run and validate the values in the spreadsheet.
Here is the final spreadsheet updated with the data from XML.

Conclusion:
A lot of APIs send their response back in XML format and it is very important to understand how we can parse this data and keep it ready to be processed in the next steps. If you want to download the fully finished bot to compare it to what you’ve built, you can find the full solution as a zip file (see attachment below). To import it into your control room, just go to the automations tab, and click the button in the top right corner labeled “Import bots…”
Packages Used:
Along with understanding XML parsing, it's very helpful to also learn JSON parsing, and here is a tutorial to guide you through the procedure.