

Prerequisites
You’ll need to have Automation Anywhere Enterprise v11 workbench installed and licensed with a bot creator license to follow along with this lab.
Background
Most all web applications have some sort of login process. The primary focus of this first exercise is to create a bot that will enter a username and password into a log-in page, and successfully log-in to a web application.
Pseudocode
Think of pseudocode as the human readable steps that our program/bot will need to accomplish. When creating a bot, it can be helpful to lay out the steps that the bot will need to take to accomplish a task. In this way, the process of translating into Automation Anywhere commands becomes more straightforward, and we can know we did everything needed.
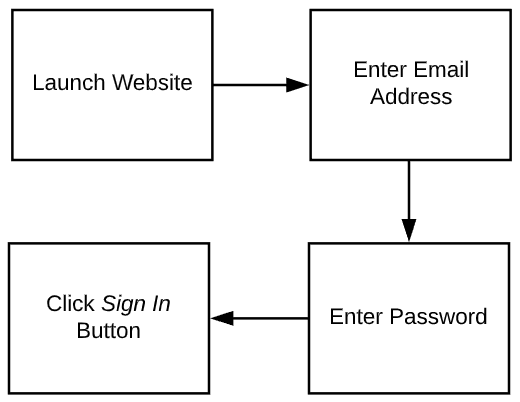
Step 1: Launch Website – We’ll have to have the website open to start entering any username/password info.
Step 2: Enter Email Address – The email address is a required field, and will be needed for us to properly log in.
Step 3: Enter Password – The password will need to be entered into the password field, and the password will have to be correct in order for our login to work.
Step 4: Click the Sign In Button – Just like as if a human were logging into this page manually, our bot will have to click the Sign In button in order to initiate the login process.
Building The Bot
With our requirements clearly defined, we can now move on to building our bot.
1.Launch and login to the Automation Anywhere Client (Either Enterprise or Community - either will work).
2. In the upper left corner of the screen, click the “New” button.
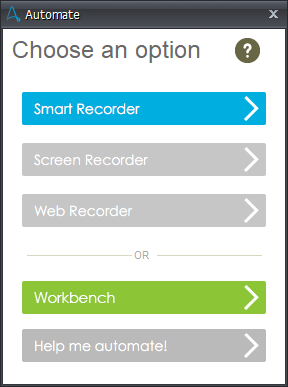
3. An Automate dialogue will appear asking how you want to get started. Press the Web Recorder button. (Don’t worry if its showing up in gray, that’s normal)
Read through steps 4-10 before continuing…once the web recorder starts, you wont be able to flip back to this page until you’re finished recording.
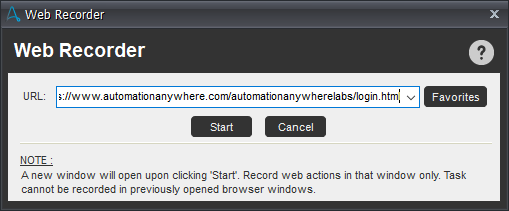
4. When prompted by the web recorder, give the following URL https://www.automationanywhere.com/automationanywherelabs/login.html and press start.
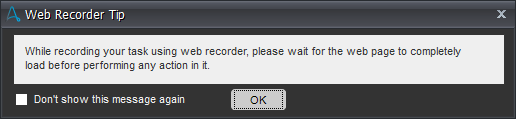
5. The Web Recorder will pop up with a Web Recorder Tip to make sure and wait for the page load to complete before performing any actions on the target page. Press OK to dismiss.
6. At this point the recorder is actively “watching” your clicks and keystrokes.
7. Click into the Email Address field, and type in user@automationanywhere.com
8. Click into the Password field, and type in Automation123
9. Click the Sign In button to complete the login.
10. After pressing the Sign In button, you should see a green window with a success message appear.
- If the login details you enter are not correct:
- Stop the web recorder by clicking the stop button
- Press Cancel on the prompt asking to save your newly created bot
- Close the IE session opened by Web Recorder and start again from step 4 of this tutorial.
11. In the Web Recorder control window, click the Stop Recording

12. A prompt will appear to give your newly created bot a name, type MyFirstBot in the Save Task dialog and click Save.
13. The task now appears in the My Tasks section of the Automation Anywhere Client.
Run Your First Bot
It’s time to run your newly created bot. Before you start, make sure you close the browser window you used previously in this tutorial. Your bot should be opening a new browser session automatically upon execution.
- Click on your bot in the Enterprise/Community Client named MyFirstBot.atmx.
- Click the green Play button and let go of your mouse.

At this point the bot should automatically launch internet explorer, enter the email address, enter the password, and press the Sign In button. Upon successful submission of the username and password above, the web login page should give a message that says: 
If your login page did not display this message, check to make sure the username and password that you entered during the web recorder section was correct.
If your Total Processing Time value is 0.00, don’t worry – it just means that from the time between when your bot entered the email address to when it pressed the Sign In button was less than one hundredth of a second. If your processing time is higher than 0.00, that’s fine too…its still likely significantly faster than how quickly a human could enter this data. Those timing differences could be explained by many factors - internet speeds, the machine processing the task, how many other applications are open in the background, etc.
Recap
Ok that was cool, but what did we just do? We used the web recorder to train the bot on exactly what to click, what data to enter, and where to click to Sign In. Right click on your MyFirstBot.atmx in the Automation Anywhere Client and select Edit from the context menu that appears. Your bot will open in a new window known as the Workbench. From here you could add commands, edit commands, etc…all of which we will get into in a future tutorial. For now, take a look at the 4 items in the Actions List. 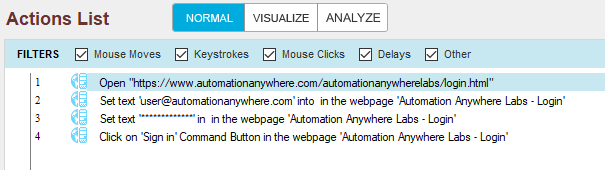
The first action is to open a browser session at the web location that we provided for the web recorder.
The second action is to set the text of ‘user@automationanywhere.com’ into the newly opened browser session identified by the name Automation Anywhere Labs – Login.
The third action is to set the text of the password field in the same browser session as the username.
Finally, the 4th action is the click the “Sign In” button on the same page.
These lines of code match up almost exactly with the pseudocode we laid out at the beginning of this exercise. Great job if you were able to get that one working.
Next Steps
Now that you were able to get a bot working using the Web Recorder, its good to know how to create the same bot manually (without the recorder) - so that you know how each of the steps from this bot get created. Well also try the exercise in another browser (chrome) so we can understand how to use different applications within our automations. If you're ready, get started now with Intro To v11 Bot Development Part II