

Integrating with Google BigQuery
The Automation 360 .21 release is out. It brings with it a host of new/interesting updates for developers - from some visual updates in regards to the way that Control Room looks to updates to various packages to improve the bot building experience for developers.
One package in particular that saw some updates in this release was the Database package - and most specifically - with its extended ODBC driver support to now include connection capabilities to data warehouses like Google BigQuery and Snowflake (among others).
To celebrate these updates, we've put together a tutorial on how Google BigQuery can be integrated with an Automation 360 bot in the .21 release. Check out the video above and some of the highlights below to learn more about BigQuery and establishing a connection from Automation 360.
What is Google BigQuery?
Google BigQuery is a data warehouse solution available from within Google Cloud. BigQuery is a serverless, scalable, multi-cloud data warehouse designed for the storage and analysis of large data collections.
In large part, Google BigQuery is frequently used for the analysis/review of data that is used to train machine learning models or connect to business intelligence platforms like Google Data Studio, Tableau, or PowerBI to allow developers/business users to gain further insights into their data. BigQuery enables developers to ingest data in batch, or by streaming data in real-time. Data retrieval/inserts can be done through SQL or through the BigQuery API.
Like many other Google Cloud offerings, Google additionally has a collection of pre-built libraries for many popular programming languages to enable developers to hit the ground running in the language of their choice. Why does this matter? If you think broadly about how bots operate: they are taking data from one system/application, doing lookups/validations/massaging the data in some way, then performing updates/inserts into another system. As a part of that entire process, there is a lot of data exhaust - meaning that the bots themselves are seeing/dealing with loads of data. For trends/insights/observations of that data, organizations may use data warehouses like Google BigQuery to store said data and possibly use that data for building out ML models, identifying further bot improvements, etc. If you want actionable insights into your data, you have to at least start that process by storing it all someplace, and for many organizations, Google BigQuery is that place.
Setting up BigQuery on Google Cloud
Creating/Selecting a Project
All of the services/products available from Google Cloud require setting up a Google Cloud project. Projects are the basis of creating, enabling, and using all Google cloud resources. In an effort to keep this tutorial primarily focused on the specifics of BigQuery and the Automation 360 integration, reference Google's guide to creating and managing projects for instructions on setting up a project if you don't have one already.
Enable the BigQuery API
With the project established, you'll be able to enable different Google Cloud products/services. In particular, we want to take a look at enabling BigQuery and the BigQuery API. As a part of enabling the API, you'll also have to establish credentials to actually use the BigQuery resource that's been enabled for your project. For the purposes of the lab, we selected "User data" to enable us to use OAuth authentication and "Web application" for our application type.
Setting up our local machine (or Bot Runner)
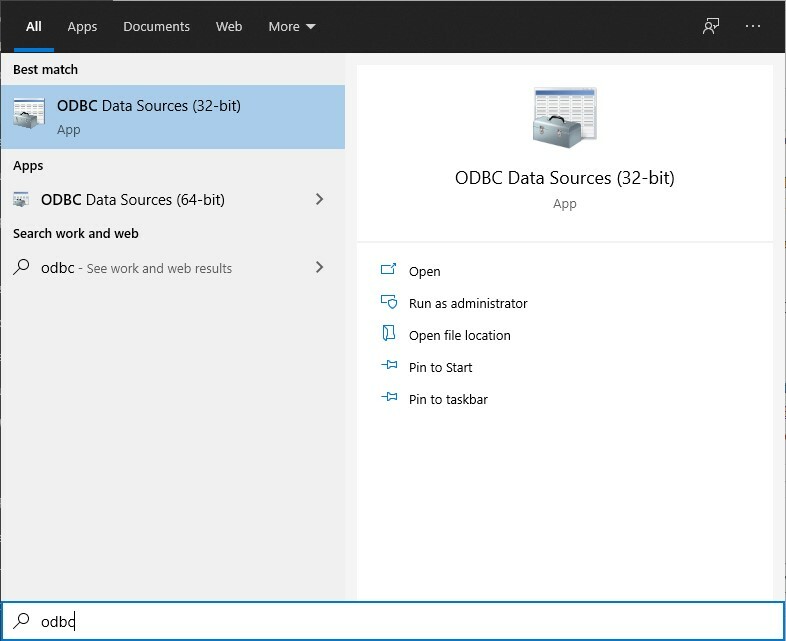
With everything taken care of on the Google Cloud side to enable BigQuery and established credentials for connecting, we are able to move into setting up a local DSN to connect to BigQuery. Start by downloading and installing the Windows 32-bit ODBC driver. These drivers are provided by Google through a collaboration with Magnitude Simba. With that driver installed, we can begin setting up the ODBC connection from our local machine/Bot Runner to the Google BigQuery resource that we'd previously set up. Note: Technically it is possible to do a "DSN-less" connection using this Magnitude Simba driver, but it goes beyond the scope/complexity of this tutorial. For more details on setting up such a connection, check out the Magnitude Simba BigQuery documentation. To set up your ODBC DSN, click on your Window Start Menu, and start typing ODBC. You'll likely see two entries - one for the 32-bit ODBC DSNs, another for the 64-bit ODBC DSNs. Since we downloaded and installed the 32-bit Simba ODBC driver, select the 32-bit ODBC Data Sources to launch its configuration.
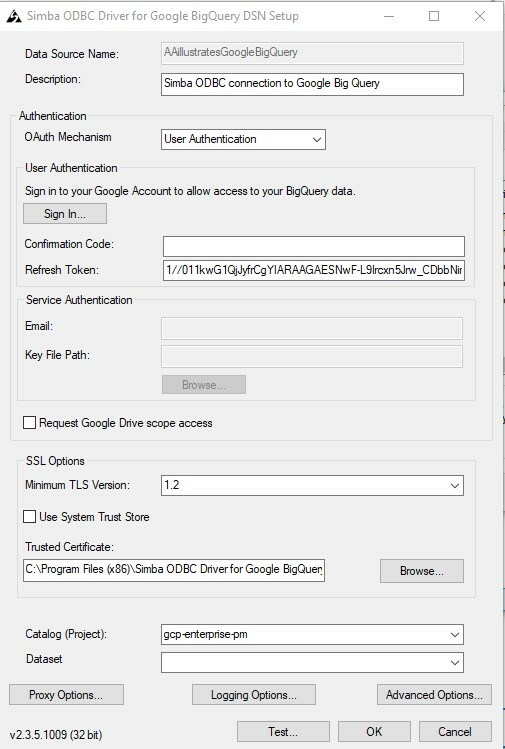
With the ODBC Data Source Administrator (32-bit) window open to the User DSN tab (default), click the Add... button to establish the creation of a new ODBC User DSN. In the Create New Data Source window that appears, select the Simba ODBC Driver for Google BigQuery and press Finish. At this point, the Simba ODBC Driver for Google BigQuery DSN Setup will appear enabling you to fill in the remaining data to establish the BigQuery connection and test. Start by giving your Data Source a name (make note of this because we'll need it later) and an optional description. In the Authentication of the configuration, select User Authentication from the drop-down before clicking the Sign In... button to establish the connection to your appropriate account. Once authenticated, you should be provided with a Confirmation Code. Copy and paste this confirmation code into the Confirmation Code field on the Simba ODBC setup screen. Once entered, click into the Refresh Token field to generate a token to be used in establishing the connection to your BigQuery data repository. Finally, at towards the bottom of the Simba ODBC Driver Setup window, select the project that was used to originally set up BigQuery, and press the Test... button to test the connection to the data repository. Assuming the test is successful, press the OK button to close the Simba ODBC setup window. Your fully configured ODBC DSN should look something like this - noting that the Refresh Token and Catalog (Project) would be unique to your configuration.
Putting it All Together
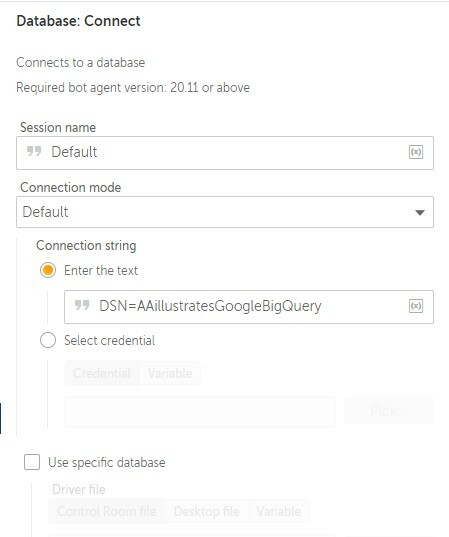
The final piece of all of this is from a bot to Google BigQuery. In a new or existing Automation 360 bot in an environment that has patch .21 or later, add the Connect action from the Database package. This will enable the bot to establish a connection from the local bot runner to Google BigQuery leveraging the DSN that we just set up. In the Connection mode dropdown, select Default, and in the Connection String field that becomes enabled, enter the appropriate name of your DSN into the Enter the text field. The format for this connection is DSN=xName where xName is the Data Source Name you used when establishing your ODBC connection. Sticking with the same name from the configuration screenshot above, the connection string text would just be DSN=AAillustratesGoogleBigQuery
From here, you can now start to use the Read From and Insert/Update/Delete actions from the Database package in order to commit, update, or retrieve data to your BigQuery repository.
Conclusion
There are tons of insights, observations, and potential ML models that can be generated by having access to lots and lots of appropriately formatted/clean data. For many organizations, Google BigQuery is where they choose to store said data because of its ease of setup/use, flexibility to connect with other systems, and its easy integrations using Automation Anywhere or one of many other supported programming languages. If you haven't checked out Google BigQuery yet, hopefully, this tutorial has given you some insights on how such a connection may be established. If you enjoyed this tutorial, consider checking out similar topics like Connecting to Excel as a Database (using the Database Package) or the Intro to Intelligent Automation where users learn about training and leveraging a custom ML model from within their bot.